
Repairing broken windows is a common household repair task that can be tackled with the right tools, materials, and knowledge. Whether you’re dealing with a small crack or a completely shattered pane, this guide will walk you through the steps to restore your window to its former glory.
The repairing process might seem daunting, but with the right approach, it can be a straightforward task. Whether you’re replacing glass, dealing with glazing compound, or ensuring your window frame is intact, this guide provides detailed instructions to make the process smooth and efficient.
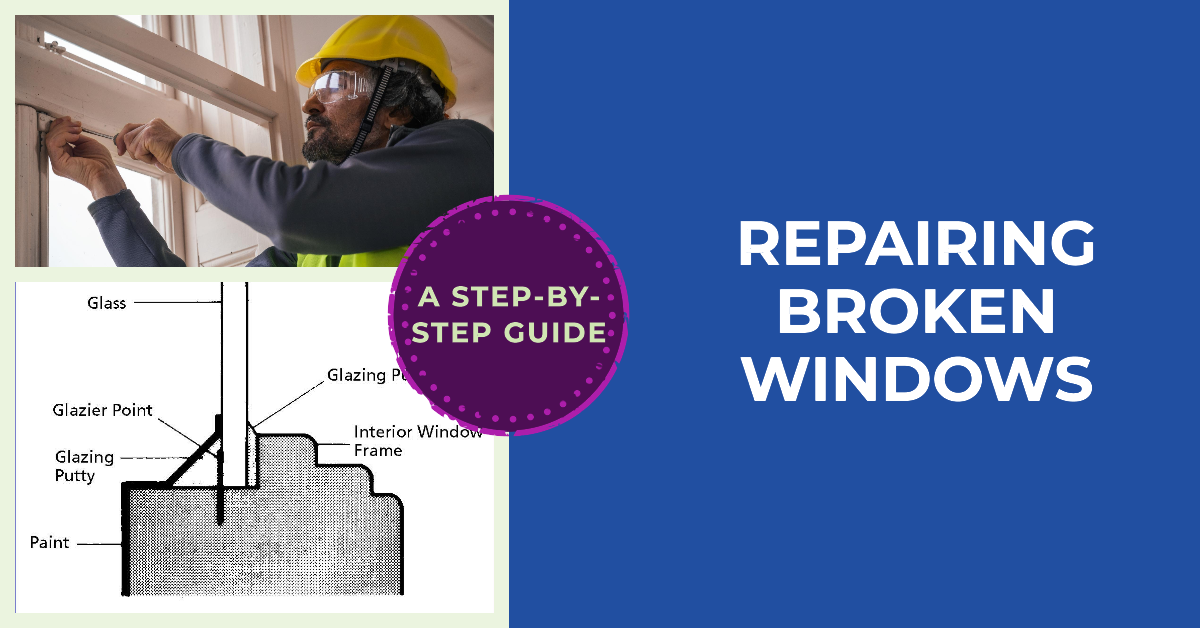
Table of Contents
- Understanding Window Types
- Assessing the Damage
- Essential Tools and Materials
- Safety Precautions
- Removing the Broken Glass
- Preparing the Frame
- Measuring for Replacement Glass
- Installing New Glass
- Applying Glazing Compound
- Painting and Finishing Touches
- Special Cases: Casement Windows
- Special Cases: Jalousie Windows
- Special Cases: Storm Windows
- Maintaining Window Frames
- Conclusion

Anatomy of window glazing shows glass setting in a rabbet
(notch) in the window frame. Ideally, glazing compound is
sandwiched between glass and frame on interior window. Note
paint overlaps glass about 1/8 inch or so to form a moisture
seal. Let the glazing compound set several days before you apply
the paint to it with an angled brush.
Understanding Window Types
Before diving into the process of repairing broken windows, it’s essential to understand the different types of windows you might encounter. This knowledge will help you choose the right materials and approach for your specific window type.
Single Strength vs. Double Strength Glass
Single strength glass is standard for many residential windows. It’s cost-effective but less durable. Double strength glass is thicker and provides better insulation and durability, making it ideal for areas prone to impact.
Tempered and Safety Glass
Tempered glass, often used in patio doors, is treated to be stronger and shatter into less dangerous pieces. Safety glass is similar, often featuring embedded wires for extra strength, making it suitable for high-traffic areas.
Insulation Glass
Also known as thermal glass, insulation glass consists of two panes separated by a spacer, providing excellent insulation. This type of glass is commonly found in larger windows and patio doors.
Assessing the Damage
Before starting any repair, assess the extent of the damage. This step ensures you gather the necessary tools and materials and plan the repair process effectively.
Visible Cracks and Chips
Small cracks or chips might be repairable without replacing the entire pane. Products like clear nail polish or special glass repair kits can be used for minor fixes when repairing broken windows.
Shattered or Missing Panes
If the glass is shattered or large pieces are missing, replacement is necessary. Ensure you remove all broken shards carefully to prevent injury and further damage.
Frame Condition
Check the window frame for any damage. A compromised frame may need repair or reinforcement before installing new glass. Properly assessing the frame’s condition is crucial when repairing broken windows.
Essential Tools and Materials
Gathering the right tools and materials is crucial for successfully repairing broken windows. Here are the essentials, with links to products available on Amazon:
- Glass
- Tape Measure
- Gloves
- Glazing Points
- Glazing Compound
- Plastic Gasket
- Spring Clips
- Putty Knife
- Pliers
- Screwdriver
- Steel Wool/Sandpaper
- Paint/Linseed Oil
- Brush
- Finish Paint for Window Trim
- Wiping Cloths
Having these items on hand will make the process of repairing broken windows more efficient and ensure you can handle any aspect of the task.
Safety Precautions
Safety is paramount when repairing broken windows. Glass can be hazardous, and proper precautions can prevent injuries.
Wear Protective Gear
Always wear gloves and safety glasses when handling broken glass. Long sleeves and pants can also protect your skin from cuts.
Secure the Area
Ensure the area around the window is clear of obstructions and people. Lay down a drop cloth to catch any falling glass and make cleanup easier.
Use Proper Tools
Using the right tools for the job not only makes the process easier but also safer. Avoid improvising with tools not designed for glass repair.
Removing the Broken Glass
Removing the broken glass is a delicate process that requires patience and care to avoid injury and further damage to the frame when repairing broken windows.
Step-by-Step Guide
- Score the Glass: Use a glass cutter to score around the damaged area.
- Remove Large Pieces: Carefully remove large shards with gloved hands.
- Clean the Frame: Use a putty knife to remove any remaining glass and old glazing compound.
Tips for Safe Removal
- Work slowly and methodically.
- Use pliers to handle stubborn pieces.
- Dispose of broken glass properly, using a sturdy container.
Preparing the Frame
Once the broken glass is removed, preparing the frame ensures a snug fit for the new pane and a long-lasting repair.
Cleaning the Frame
Use steel wool or sandpaper to remove old glazing compound and smooth the surface. Clean the frame thoroughly to ensure the new glass adheres properly.
Priming the Frame
Apply a coat of linseed oil or primer to the frame. This step protects the wood and creates a better seal for the new glazing compound.
Checking for Damage
Inspect the frame for any damage or rot. Repair or replace damaged sections to ensure the frame can support the new glass. This is a crucial step when repairing broken windows.
Measuring for Replacement Glass
Accurate measurements are crucial for fitting the new glass correctly. Here’s how to measure your window accurately.
How to Measure
- Measure the Opening: Measure the width and height of the window opening at three different points each and use the smallest measurement.
- Account for Expansion: Subtract about 1/8 inch from each dimension to allow for expansion and contraction.
Double-Check Your Measurements
Always double-check your measurements before ordering or cutting new glass. A small mistake can lead to improper fitting and wasted materials.
Installing New Glass
With the frame prepared and measurements confirmed, it’s time to install the new glass.
Placing the Glass
- Dry Fit the Glass: Place the new glass in the frame to check for fit.
- Insert Glazier Points: Use a glazing tool or putty knife to press glazier points into the frame to secure the glass.
- Check for Stability: Ensure the glass is held firmly in place by the glazier points.
Securing the Glass
- Space the Glazier Points: Place glazier points every 6 inches around the perimeter of the glass.
- Avoid Excess Pressure: Press glazier points in gently to avoid breaking the new glass.
Applying Glazing Compound
Applying glazing compound seals the glass in place and protects it from the elements.
Preparing the Compound
- Knead the Compound: Roll the glazing compound into a thin rope with your hands.
- Apply to Frame: Press the compound into the frame, ensuring it covers the edge of the glass.
Smoothing the Compound
- Use a Putty Knife: Hold the knife at a 45-degree angle and smooth the compound to create a clean, beveled edge.
- Remove Excess: Wipe away any excess compound with a damp cloth.
Letting it Cure
Allow the glazing compound to cure for several days before painting or exposing it to the elements.
Painting and Finishing Touches
Painting over the glazing compound protects it and gives a finished look to your repair.
Choosing the Right Paint
Select a paint designed for exterior use to withstand weather conditions. Match the color to your existing window trim for a seamless look.
Applying Paint
- Prime First: Apply a coat of primer to the glazing compound and frame.
- Paint Over: Use a small brush to apply paint, slightly overlapping the glass to seal the glazing compound.
Final Inspection
Inspect your work for any gaps or areas
needing touch-up. Ensure the paint is even and the glazing compound is fully covered.
Special Cases: Casement Windows
Casement windows, which open via a crank mechanism, require special attention when repairing broken windows.
Removing and Reinstalling Sashes
- Remove Sash: Unscrew the hinges and carefully remove the sash.
- Replace Glass: Follow the standard glass replacement steps.
- Reinstall Sash: Reattach the sash and check for smooth operation.
Checking the Mechanism
Ensure the crank mechanism is functioning properly. Lubricate if necessary to maintain smooth operation.
Special Cases: Jalousie Windows
Jalousie windows, with their multiple slats, present unique challenges for glass replacement.
Removing and Replacing Slats
- Remove Slats: Carefully remove the individual slats.
- Replace Glass: Follow the same process as for standard windows, applying glazing compound to each slat.
- Reinstall Slats: Place the slats back into the frame and secure them.
Ensuring Proper Seal
Check each slat for a proper seal to prevent drafts and water infiltration.
Special Cases: Storm Windows
Storm windows provide extra protection and require specific steps for glass replacement.
Removing the Storm Window
- Remove the Window: Unscrew the frame and carefully remove the storm window.
- Replace Glass: Follow standard replacement procedures.
- Reinstall Window: Reattach the storm window, ensuring a secure fit.
Checking Seals and Insulation
Ensure the storm window is properly sealed and provides adequate insulation.
Maintaining Window Frames
Regular maintenance extends the life of your windows and prevents future damage.
Cleaning and Inspecting
- Clean Frames: Regularly clean the frames to prevent dirt buildup.
- Inspect for Damage: Check for signs of rot, peeling paint, or other damage and address promptly.
Applying Protective Coatings
Apply paint or sealant to protect the frames from the elements. Regular upkeep will keep your windows looking and functioning well.
Conclusion
Repairing broken windows is a manageable task with the right knowledge and tools. By following this comprehensive guide, you can restore your windows efficiently and safely, ensuring your home remains secure and energy-efficient. Regular maintenance and timely repairs will prolong the life of your windows and enhance the comfort of your living space.
Online Tutorials for Repairing Broken Windows
FAQs
1. How long does it take to repair a broken window?
The time required to repair a broken window depends on the extent of the damage and your experience level. Typically, it can take anywhere from 1 to 3 hours.
2. Can I use any glass for window repair?
It’s best to use the same type of glass that was originally installed. Consult with a glass supplier to ensure you get the correct type.
3. What if the window frame is damaged?
If the frame is damaged, it should be repaired or replaced before installing new glass. Ignoring frame damage can lead to further issues and poor insulation.
4. How often should window frames be maintained?
Inspect and maintain your window frames at least once a year. Regular cleaning and repainting can prevent damage and extend the life of your windows.
5. Can I repair a broken window myself, or should I hire a professional?
If you are comfortable with DIY projects and have the necessary tools, you can repair a broken window yourself. However, for large or complex repairs, it may be best to hire a professional.